You can quickly convert or combine .msg files (emails) into PDFs using the right-click menu with Foxit PDF Editor installed. Right-click a message file, and choose Convert to PDF in Foxit PDF Editor to convert the file to a new PDF; or choose Combine files in Foxit PDF Editor… to convert multiple files. See also One-click PDF Creation from Any File.
Foxit PDF Editor also adds a plugin in Microsoft Outlook when installed and appears as a tab entitled FOXIT PDF in the Outlook toolbar. The commands in the tab allow you to create a PDF file or PDF portfolio from the selected email message(s) or folder(s).
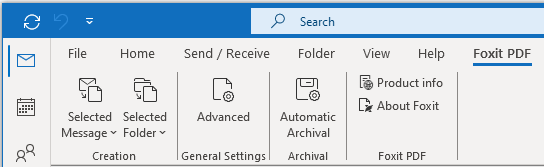
The Foxit PDF tab in Microsoft Outlook
- To create a new PDF or PDF portfolio from the selected message(s) in a folder in the Outlook, please select the message(s) you want to convert and click Selected Message > Create New PDF…, or right-click the selected message(s) and choose Convert to Foxit PDF. Then specify the name and the location of the created PDF or PDF portfolio to begin the conversion.
Notes:
- To create a new PDF portfolio, the Output PDF Portfolio option should be checked in the Foxit PDF Editor Add-in dialog box after clicking Advanced. Each message will be converted to a single PDF.
- If the Output PDF Portfolio option is not checked, the selected message(s) will be merged into one continuous PDF according to the time of each message was sent or received, i.e. the latest message is on the first page.
- The default name of the created PDF or PDF portfolio will be the title of the selected message or the folder name of the selected messages.
To create a new PDF or PDF portfolio from the selected folder(s), please click Selected Folder > Create New PDF…, or right-click a folder and choose Convert to Foxit PDF. Select folders you want to convert in the pop-up Convert folder(s) to PDF dialog box. Then specify the name and the location of the created PDF or PDF portfolio to begin the conversion.
Notes:
- To create a new PDF portfolio, the Output PDF Portfolio option should be checked in the Foxit PDF Editor Add-in dialog box after clicking Advanced. Each message will be converted to a single PDF and then the created PDF will be put into corresponding folders in the portfolio.
- If the Output PDF Portfolio option is not checked, all messages in the selected folders will be merged into one continuous PDF. If you create a PDF file from one folder, the latest email message will be arranged on the first pages of the created PDF file. If you create from multiple folders, the order is based on the order how each folder is displayed on the Convert folder(s) to PDF dialog box first and then the time each message was sent or received.
- To append to an existing PDF or PDF portfolio from the selected message(s), please select the message(s) you want to convert and click Selected Message > Append to Existing PDF…, or right-click the selected message(s) and choose Append to Foxit PDF. Select the existing PDF or PDF portfolio you want to append to and click Open. The selected message(s) will be appended to the end of the existing PDF. If the existing PDF is a PDF portfolio, the selected messages will be created to single PDF files and then put into corresponding folders in the existing PDF portfolio.
- To append to an existing PDF or PDF portfolio from the selected folder(s), please click Selected Folder > Append to Existing PDF…, or right-click a folder and choose Append to Foxit PDF. Select folders you want to convert in the pop-up Convert folder(s) to PDF dialog box. Select the existing PDF or PDF portfolio you want to append to and click Open. All messages of the selected folder(s) will be appended to the end of the existing PDF. If the existing PDF is a PDF portfolio, each message of the selected folders will be created to single PDF files and then put into corresponding folders in the existing PDF portfolio.
- To customize your PDF conversion settings before creating PDF, click the Advanced button and select the desired options as needed in the pop-up Foxit PDF Editor Add-in dialog box. For details, please refer to Setting Foxit PDF Editor Printer Properties. You can also select the following options:
- Attachment – Select an option to specify whether to include attachments of the selected email messages in the converted PDFs.
- Do not include attachments: If selected, all attachments in the selected email messages will not be included in the converted PDFs.
- Attach all attachments to the document: Keeps the attachments of the selected email messages or folders as the created PDF’s attachments (or the attachments of the PDFs in the created PDF portfolio), with the file types of the attachments unchanged. And a link to each attachment will be added to the corresponding text (i.e. the attachment name) in the created PDF document. To open an attachment, double-click it in the Attachments panel in the navigation pane or directly double-click its name in the document.
- Convert and append all attachments to the end of the document: While converting the selected email messages to PDFs, all attachments of the selected email messages will be converted to PDF formats and appended to the end of the converted PDFs.
- PDF Portfolio – Creates a new PDF portfolio from the selected email message(s) or folder(s) and keeps the folder information of the selected folders in the created PDF portfolio (i.e., the location path information of the folder in your email system). If you don’t want to keep the folder information during conversion, uncheck the Convert folder information option under the Output PDF Portfolio option.
- Page Layout – Specify the page size, margins and orientation for the generated PDF as needed.
- Foxit PDF Editor supports automatic email archiving based on your settings. Click Automatic Archival and check Enable Automatic Archival in the pop-up Automatic Archival dialog box to do archival settings:
1) Specify the frequency and the time of the day to do the automatic archiving.
2) (Optional) Enable “Maintain Log of Archival” to create a record for each archiving. Click Choose File … to name the log file and specify its storage location.
3) In Choose Folders for Automatic Archival box, click Add to select email folders you need to archive and specify the name (Check the box for Append the archive date to the specified archive file name so that the older archived files will not be overwritten) and location of the archived email PDF. You can also click Delete to remove folders from the list or click Change Archive File… to modify the name and location of the archived email PDF.
4) (Optional) You can start archiving email right after you choose the folders for automatic archival by clicking Run Archival Now button in the top right corner of the Automatic Archival dialog box.
5) Click OK to complete setting.
Note:All archived email PDFs are PDF portfolios.
With Foxit PDF Editor installed, you can quickly convert a file to a PDF and send it with Microsoft Outlook.
- Create a new email, and click the Foxit PDF tab in the Outlook ribbon.
- Click Attach as Foxit PDF, a dialog box pops up for you to choose a file, and click Open.
- Specify a location in the dialog box to save the PDF to be generated and click Save. The generated PDF will be automatically attached to the email.
- After typing recipients and message, click Send.