1. Click Protect > Restrict Access.
2. Choose the template to add AIP encryption. If you have more than one server, please firstly move the cursor to the name of the server, and then the templates on this server will be shown on the submenu. Click Refresh Templates to get the latest official templates from the server. You can also create custom templates. For more detailed information, please refer to Template Creation.
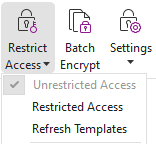
3. If you do not want to use the template, please click Restricted Access.
- Type your account name and password when you login to the AIP server for the first time.
Click the icon
 to add users who you want to authorize for reading permission. To authorize anyone to read this file, select the icon
  on the right side.
Tip: If you have an Outlook Email Client, the contact list of Outlook will pop up when you click the icon
. You can choose the email address directly. (You can also just type certain letters included in the email address, and then click the icon . The system will help you enter the complete address according to the contact list.) Then you can go on to the More Options step.
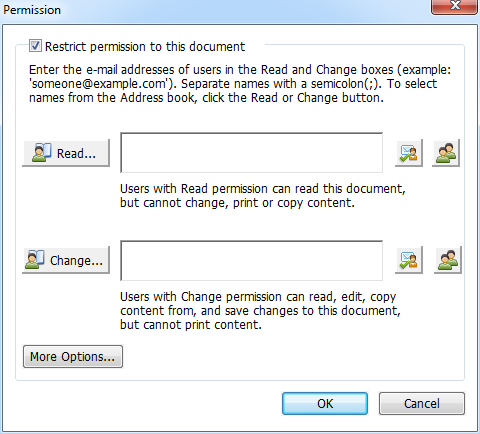
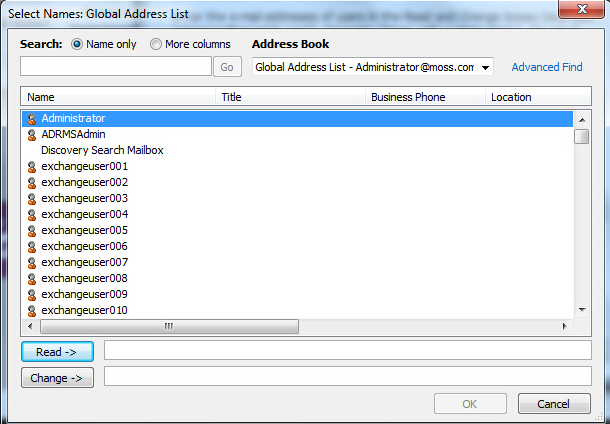
Choose the object types (users or group) and the server. Then type the e-mail addresses of the authorized users into the text box or click Advanced to open the e-mail address list on the server to choose an address directly.
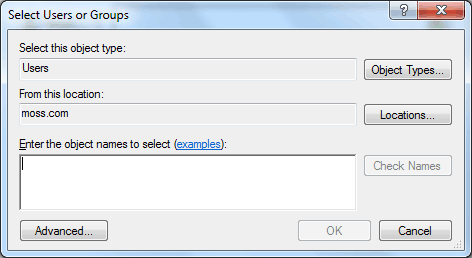
- Click OK to exit the Select Users or Groups dialog box.
- Click More Options in the Permission dialog box. The users you selected now will be shown on the text box. You can also add or delete users as needed here.
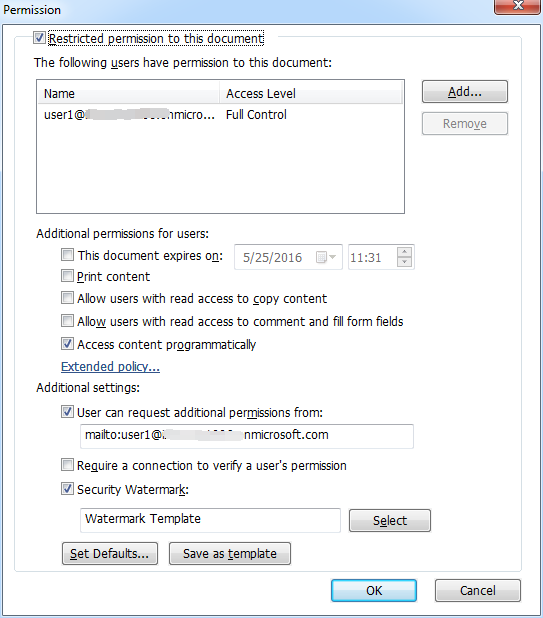
Additional permissions for users:
This document expires on: check it to set the expiration date. The document cannot be opened after the specified date.
Print Content: check this option to allow the users above to print the PDF files.
Allow users with read access to copy content: enable the users who only have read permission to copy content.
Allow users with read access to comment and fill form fields: enable the users who only have Read permission to make comments and fill in form fields.
Access content programmatically: enable users to run the JavaScript in the document.
Extended Policy: complete PDF protection and control of document usage. The policy will allow document owners to control the following items.
Only allow access to these pages: specify the page number(s) that a user is allowed to access.
Only allow access by this IP range: specify an IP range that is allowed to access a document.
Number of accesses: specify the number of times that a user is allowed to access a document.
Number of prints: specify the number of times that a user is allowed to print a document

Note: To specify the “Number of accesses” and “Number of prints” items in an on-premise environment, please refer to Web Service Configuration to configure the web service and SQL first, and then enable the extended policy with the Foxit Configuration Tool.
Additional settings:
User can request additional permissions from: if users want to apply for any permission, the application will open the email client and list the email address you typed into the text in the Recipient's Address automatically. You can type a URL as well.
Require a connection to verify a user’s permission: check this option to let users verify their license every time they open the encrypted file.
Security Watermark: add a security watermark to the PDF files. For the detailed instructions, please refer to Security Watermark.
Set Defaults: set the additional settings as default.
Save as template: the security setting set above can be saved as a template for further use.
4. If users need to request additional permissions for a PDF file, please do the following:
- Open the file and choose File > Properties. Click the Security tab for the document properties.
- At the bottom of the Security tab, click Request additional permissions ….
Note: Foxit PDF Editor also supports Microsoft IRM Specification V1, V2, and PPDF, of which Microsoft IRM Specification V2 is the default format when you encrypt PDFs with AIP. The encryption policy of Microsoft IRM Protection does not include dynamic watermark, extended policy, and dynamic revocation. To change the default Microsoft IRM format, do the following:
- Type regedit.exe in the Run window or in the search box of the Start menu and navigate to the following path: HKEY_LOCAL_MACHINE\SOFTWARE\Policies\Foxit\PDFEditor\RMS\Preferences.
Create a new REG_DWORD 32 value:
Name: UseMicrosoftIRMV1.
Use the corresponding value to set the format as default as below.
V1: 1
V2: 2
PPDF: 3